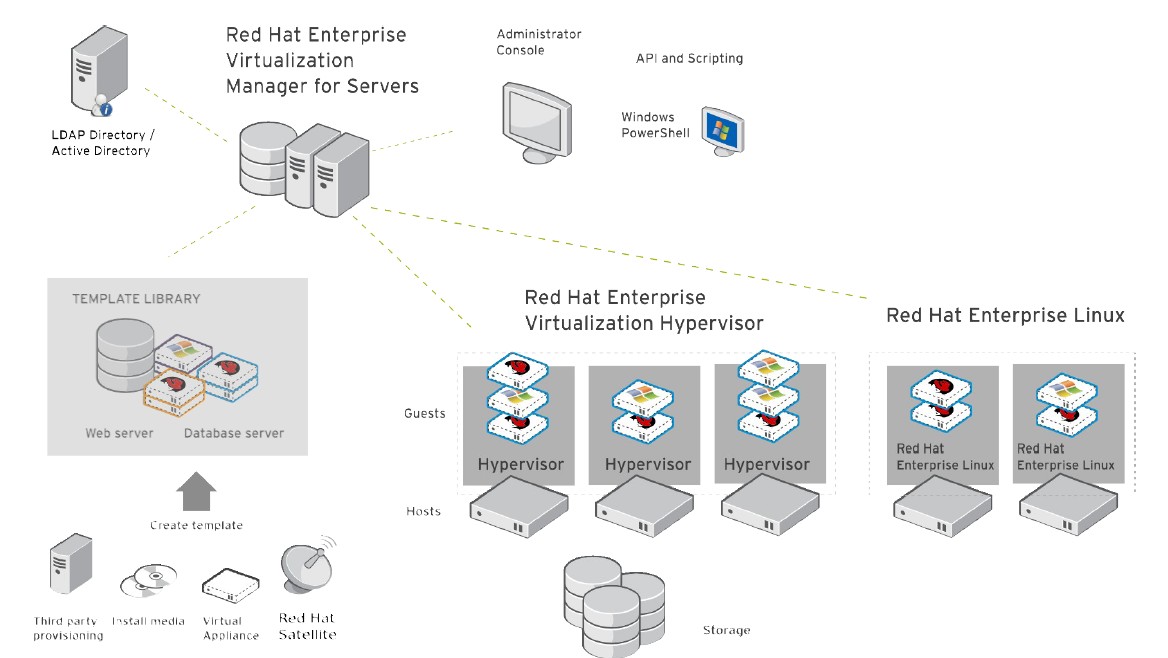
AT Enterprise Virtualization solution
RHEV provides a complete solution for server virtualization management. Red Hat Enterprise Virtualization has been designed from the platform, Red Hat Enterprise Linux, which he extends the functionality, to bring down high barriers facing the ubiquity of virtualization in data centers. Red Hat Enterprise Linux has gained the trust of thousands of organizations and is installed on millions of systems in strategic workloads.

Installing the management console RHEVM
Before installing the management console on the server, verify that the following prerequisites is well respected:
- Operating system: Windows Server 2003 R2 or Windows Server 2008 (recommended)
- The IIS must be installed
- If you are running Windows Server 2003 you must install PowerShell 2.0 available on Windows Update or the Microsoft website.
- Microsoft Frameworks 3.5.1
Once the installation file to launch click Next and accept the terms of use.
Arrived at the above screen make sure all the boxes are checked and click Next.

Select "install a SQL Server 2005 Express Locally" and click next.

Check the installation directory and click next.

Uncheck the box strength SSL and click next

Fill in the requested information
Click next

Port Number: 25285

Click next

Click ignores the Manager installation begins.
Administration RHEVM
This section shows the procedure to connect to the management console RHEVm
Open your browser enter the address bar:
http: // [ip address or name] / RHEVmanager

If this is not the case install the certificate by clicking the link.

The above screenshot is from the RHEVm authentication interface.
1 Installing RHEV hypervisor.
Boot from ISO hypervisor. After loading the next interface should appear:

Press 1 and input.

Select "configure" grave with the 1 key and confirm with input
Select the disk or hypervisor will install and validate.
Once the task by selecting validate the 3 rdinput (commit configuration).
Once the formatting you complete the wizard redisplay the main menu.
Press 2 (configure authentication)
Select the 1 st entered and enter the root password of the hypervisor.
Do the same for the 2 nd entrance.
Once set select the 3 rd entry to return to the main menu.
Configure the hostname by pressing 3 and then input.
When you ask the interface type the full name of the hypervisor
After configuring the hostname type 4 to configure the network.

Select the network interface configured (usually ETH0)

Type n and then enter

Type n and then enter.

Type S and enter
Configure the IP configuration of the hypervisor by following the instructions on the screen.
Then configure your DNS server in the same way by selecting DNS on the main menu of your hypervisor network configuration.
Do the same for the NTP server.
Select Save And Return To Menu to return to the main menu.
Then save your RHN machine by pressing 5.
Select 1) Register to public RH n
Perform recording with your Red Hat Account
Once registration is complete RHN press 6 (Configure the host for red hat enterprise).
Type [ip of your server RHEVm]: 80
Then press enter
If communication is established correctly between the 2 machines hypervisor should return the following message:
"The RHEV Manager's address is set"
"The RHEV Manager's harbor is set. Do you even lift
Type [ip RHEVm your server]: 25285
Then press enter.
Once configuration is complete you will be back to the main menu.
Select 8 (install locally and reboot).
Once the installation is complete return on our management console.
If the configuration has been completed, a new HOST should be waiting in your RHEVM interface.
To enable it, right click on it and click approve. The host will be added to the cluster.
If no host is waiting, go to the hypervisor concerned and restarted the VDSM-reg service through the command-reg VDSM Service restart.
2 Configuring the Cluster
Configuring the storage space
Once your hypervisors added to your cluster, you must create a DATASTORE for your hosted VMs.
RHEV is able to manage multipathing fiber channel.
To do this go to the Storage tab and click the New button domain:


Domain Function: DATA
Storage Type: FCP
The list of VMFS will appear. (Do not forget to make the process of creating and VMFS presentation on the interface of the bay).Check VMFS converné and click the ADD button.
Then return to the tab and select DATASTORE on down the STORAGE tab and click the button attach storage.

Then select the VMFS that you have previously set.
This procedure is used to assign to a DataCenter storage esspace.
Repeat the process by creating a storage space with the following parameters:
- Domain function: ISO
- Storage Type: NFS
and attach it to your Data Center. This storage space will store ISO and templates.
The disadvantage is that the storage protocol must be absolutely NFS.
6 Managing ISOs
As we have seen above the ISOs library must have its own dedicated solely DATASTORE using the NFS protocol.
To upload ISOs secure ways REDHAT provides a tool installed with the Manager appointed ISO UPLOADER

ISO UPLOADER automatically detects your DATACENTER parameter is to autonomously for login with your NFS server.

To add an ISO image, click on ADD and select the ISO images you want UPLOADER. Once you have completed your list, click UPLOAD.ISO UPLOADER take charge of incorpérer ISOs directly to your library. We will see below how to exploit it.
On the command line you can also upload a ISO:
rhevm-iso-uploader -iso-domain = ISODomain upload <iso file>
7 Managing VMs
The management of virtual machines is indentique over other virtualisations products.
Create a new VM:
Click the Virtual Machines tab and click New Server:

Here you can set the configuration here "hardware" of your VM.

In this section, you can set the high availabilty system by checking 'Highly Available "
The choices "low", "Medium", "High" to define

In this section, pourez setting boot sequence and assign to your VM ISO you will eventually uploaded through the tool ISO UPLOADER.

After you do this job, click OK.
Once the task of creating the finished vm, it will cause him a disc and a virtual network interface. To do this click on your newly created VM and click "guide me".

Then click on "configure Network Interfaces".Once the parameters indicated as below click OK.